Code Linting and Auto-Formatting for WordPress Projects with VS Code

Linting is a way to automatically check code for potential errors and formatting issues.

Once code standards are defined for your WordPress project, linting issues can be displayed directly in VS Code as you work and most code formatting issues can be autocorrected on save.

See How it Works

To get started, you’ll need to have Composer installed locally. This setup uses the WordPressVIPMinimum and WordPress-Extra rulesets. If you want to see a working example, check out my WooCommerce Coupon Restrictions extension on GitHub.

Set up composer.json file

Linting can be set up for a plugin, theme, or an entire WordPress site. To get started, create a composer.json file in the root of your project directory.

To use the WordPressVIPMinimum and WordPress-Extra rulesets you’ll need to install two composer packages.

composer require dealerdirect/phpcodesniffer-composer-installer --dev
composer require automattic/vipwpcs --dev

Set up phpcs.xml

Next we’ll need to define the rulesets to use and which files or directories to check. That happens in the phpcs.xml file, which also goes in the root of your project directory. See this phpcs.xml as an example.

The file contents should look something like this:

<?xml version="1.0"?>
<ruleset>
	<arg name="basepath" value="."/>
	<arg name="extensions" value="php"/>
	<arg name="severity" value="4"/>
	<arg name="tab-width" value="4"/>
	<arg name="parallel" value="80"/>
	<arg name="cache" value=".phpcs-cache"/>
	<arg name="colors"/>

	<exclude-pattern>*/.git/*</exclude-pattern>
	<exclude-pattern>.github/</exclude-pattern>
	<exclude-pattern>*/vendor/*</exclude-pattern>
	<exclude-pattern>*/node_modules/*</exclude-pattern>
	<exclude-pattern>*/tests/*</exclude-pattern>
	<exclude-pattern>*/bin/*</exclude-pattern>

	<config name="testVersion" value="7.4"/>
	<config name="php_version" value="70407"/>

	<!-- Ignore warnings, show progress of the run and show sniff names -->
	<arg value="nps"/>

	<!-- Directories to be checked -->
	<file>.</file>

	<!-- WordPress -->
	<rule ref="WordPressVIPMinimum"/>
	<rule ref="WordPress-Extra"/>
	<rule ref="PSR2.Methods.FunctionClosingBrace"/>
</ruleset>

Run Linting and Fixing via Command Line

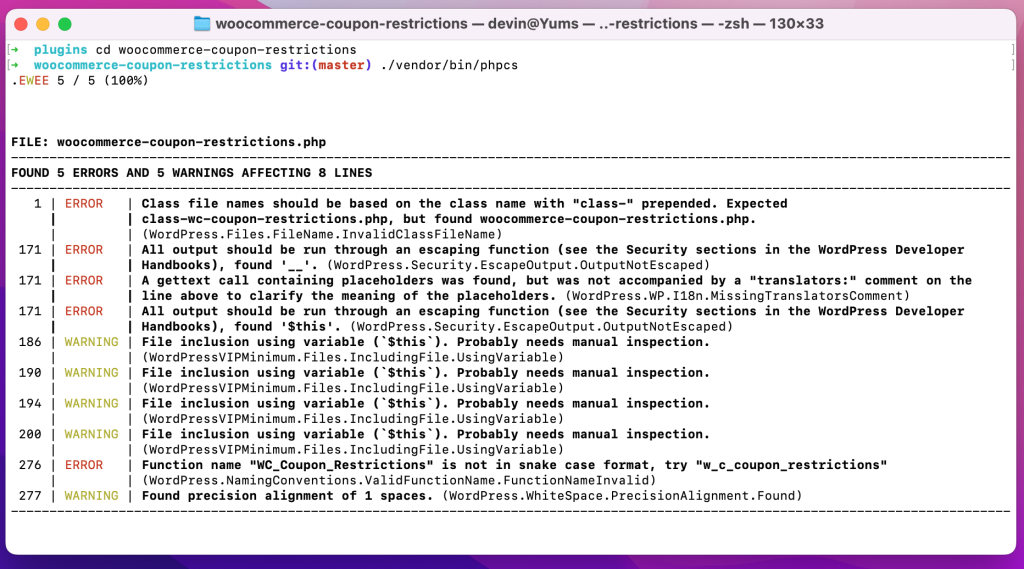
To see if everything is set up correctly, you can the checks via the command line.

To lint your codebase, run:

./vendor/bin/phpcs

If everything is working correctly, you should see an output like this:

To autofix linting issues (that can be corrected automatically, run:

./vendor/bin/phpcbf

Setup for VS Code

There’s a number of different VS Code extensions that integrate with PHPCS, but setup that has worked best for me is PHP Intelephense with PHP Sniffer & Beautifier. I also highly recommend setting an .editorconfig file for you project, and installing EditorConfig for VS Code to define you indent style and sizes.

Once you have these extensions installed, you should see linting issues highlighted directly in VS Code. Formatting and spacing issues can also be autoformatted and fixed on save.

WooCommerce: Prevent Order Items from Returning to Stock

Stock from orders can get added back to inventory for a variety of reasons: order was refunded, order was switched back to pending, or item was removed from an order.

Generally, this is what you would want WooCommerce to do. But in certain specific cases you may want to ensure stock is never returned to inventory. Here’s how:

// Defaults the edit order UI to not restock products on refund.
add_filter( 'woocommerce_restock_refunded_items', '__return_false' );

// Prevents items from being returned to stock when status changes.
add_filter( 'woocommerce_can_restore_order_stock', '__return_false' );

// Prevents items from being returned to stock when line item adjustment is made.
add_filter( 'woocommerce_prevent_adjust_line_item_product_stock', '__return_true' );

Workflow Tip: Make Processing Orders Editable

The line items in WooCommerce orders are only editable when the order is in a “Pending” or “On Hold” status. In general this makes sense. If an order is processing, it means the payment has already been accepted and any line item changes would likely require a refund (using the refund functionality) or a new payment (likely a separate order).

However, some business may have products that are frequently swapped or changed while an order is in processing, and it doesn’t make sense to have to switch the status to update the order. In those cases, you can use the wc_order_is_editable filter.

function devpress_processing_orders_editable( $is_editable, $order ) {
    if ( $order->get_status() === 'processing' ) {
        $is_editable = true;
    }

    return $is_editable;
}
add_filter( 'wc_order_is_editable', 'devpress_processing_orders_editable', 10, 2 );

WooCommerce: How to Remove the Order Notes Field on Checkout

In WooCommerce, an optional “Order Notes” field is generally shown at the bottom of the checkout page.

You can easily remove this field using a plugin or with custom code.

Remove with a Plugin

The free plugin Checkout Field Editor (Checkout Manager) for WooCommerce allows you to edit, remove or add fields in the checkout form.

  1. Install the plugin
  2. Go to the settings page for the plugin
  3. Go to the “Additional Fields” section
  4. Select the “order_comments” field and click “Remove”
  5. Click “Save Changes”
Checkout Field Editor Plugin

Remove with Code

Here’s the code snippet to remove the order notes field from checkout:

/**
 * Remove the order field from checkout.
 */
function devpress_remove_checkout_phone_field( $fields ) {
	unset( $fields['order']['order_comments'] );
	return $fields;
}
add_filter( 'woocommerce_checkout_fields', 'devpress_remove_checkout_phone_field' );

There’s also an alternate method, which is just a one line filter:

add_filter( 'woocommerce_enable_order_notes_field', '__return_false', 9999 );

WooCommerce: How to Remove the Phone Number Field on Checkout

If a customer’s phone number is not required for orders or support, removing the phone number field is a great way to simplify the checkout form.

You can either do this with code or a plugin, depending on what you are more comfortable with.

Remove with a Plugin

The free plugin Checkout Field Editor (Checkout Manager) for WooCommerce allows you to edit, remove or add fields to the checkout form.

  1. Install the plugin
  2. Go to the settings page for the plugin
  3. Select the “billing_phone” field and click “Remove”
  4. Click “Save Changes”
Checkout Field Editor Plugin

Remove with Code

Here’s the code snippet to remove the billing phone number field from checkout:

/**
 * Remove the phone number field from checkout.
 */
function devpress_remove_checkout_phone_field( $fields ) {
	unset( $fields['billing']['billing_phone'] );
	return $fields;
}
add_filter( 'woocommerce_checkout_fields', 'devpress_remove_checkout_phone_field' );

Code Snippet: Remove the Cart from the Storefront Theme Header

The cart is hooked in using the storefront_header action. To remove it:

/**
 * Remove the cart from the theme header.
 */
function prefix_storefront_mods() {
    remove_action( 'storefront_header', 'storefront_header_cart', 60 );
}
add_action( 'init', 'prefix_storefront_mods' );

If you’d like to remove it from just the home page (or other specific pages), you can use a conditional statement:

function prefix_storefront_mods() {
	if ( is_front_page() ) {
    	remove_action( 'storefront_header', 'storefront_header_cart', 60 );
	}
}
add_action( 'init', 'prefix_storefront_mods' );

How to Dequeue Scripts and Styles in WordPress for Improved Page Speed

Many WordPress plugins load scripts and styles on every page of a website even though they may just be needed on a few specific pages. For example, WooCommerce loads at least 3 scripts and 4 styles on every page, even if ecommerce functionality (like a cart or products) aren’t shown on those pages.

I recently went on a performance rampage at Universal Yums and removed ~300kb of enqueued assets that were not needed on our home page- which shows there can be quite a bit of fat to trim.

Continue reading