At Universal Yums we ship over 100,000 packages each month. When printing shipping labels, we’d always have a few hundred rejected by the carrier as invalid. This meant we had to reach back out to the customer to get a corrected address or see if we could resolve the issue ourselves, which added time to fulfillment process.
A lot of orders with invalid addresses had fairly minor issues. For example, the city and zipcode correct, but the state was incorrect. Or the city name was spelled incorrectly. Or the zipcode had an incorrect digit. These types of issues can all be corrected automatically with address validation.
Adding a metabox to the WooCommerce orders screen is a bit different High Performance Order Storage (HPOS). If you want to support both HPOS and the legacy order system, here’s how to do it.
<?php
namespace Your_Namespace;

use Automattic\WooCommerce\Internal\DataStores\Orders\CustomOrdersTableController;

/**
 * Class Metabox.
 *
 * Example for how to add a metabox to the order screen that supports both HPOS and legacy order storage.
 * More information: https://github.com/woocommerce/woocommerce/wiki/High-Performance-Order-Storage-Upgrade-Recipe-Book#audit-for-order-administration-screen-functions
 */
class Metabox {

	public static $instance;

	/**
	 * Main Metabox Instance.
	 *
	 * Ensures only one instance of the Metabox is loaded or can be loaded.
	 *
	 * @return Metabox - Main instance.
	 */
	public static function instance() {
		if ( is_null( self::$instance ) ) {
			self::$instance = new self();
		}

		return self::$instance;
	}

	/**
	 * Constructor.
	 */
	public function __construct() {
		add_action( 'add_meta_boxes', array( $this, 'address_validation_controls' ) );
	}

	/**
	 * Adds a metabox to the order edit screen for address validation.
	 */
	public function address_validation_controls() {
		$screen = wc_get_container()->get( CustomOrdersTableController::class )->custom_orders_table_usage_is_enabled()
		? wc_get_page_screen_id( 'shop-order' )
		: 'shop_order';

		add_meta_box(
			'address_validation_actions',
			__( 'Validate Address', 'textdomain' ),
			array( $this, 'render_address_validation_actions' ),
			$screen,
			'side',
			'high'
		);
	}

	/**
	 * Renders out the HTML shown in the metabox.
	 */
	public function render_address_validation_actions( $post_or_order_object ) {
		$order = ( $post_or_order_object instanceof WP_Post ) ? wc_get_order( $post_or_order_object->ID ) : $post_or_order_object;

		if ( ! $order ) {
			return;
		}

		// We can only validate US addresses.
		if ( $order->get_shipping_country() !== 'US' ) {
			return;
		}
		?>

		<div class="action-address-validate">
			<p>Validate the shipping address.</p>
			<button type="button" class="button format-address">Validate Address</button>
		</div>
		<?php
	}
}
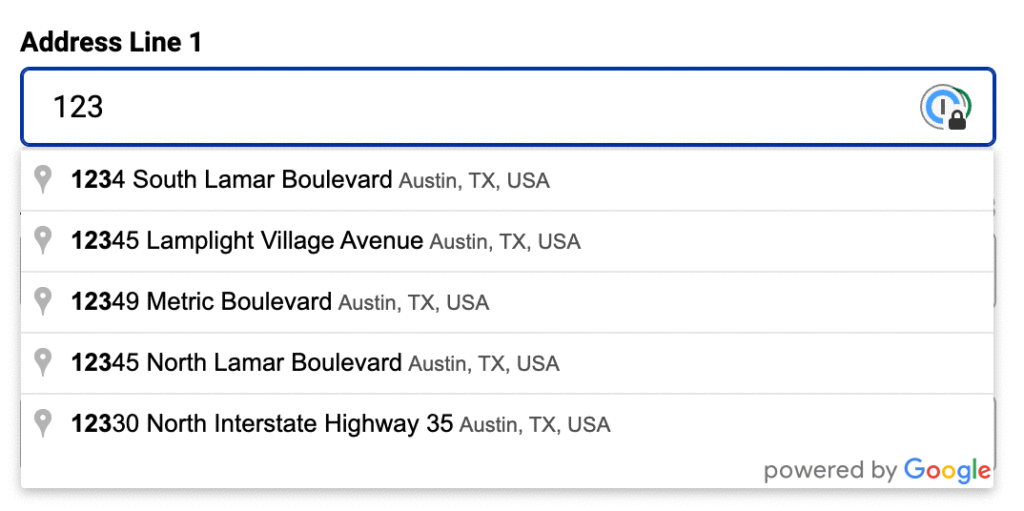
We implemented address autocomplete for on the checkout page at Universal Yums a couple years ago, but had never A/B tested its impact on conversions until recently.
It makes intuitive sense that address autocomplete would reduce friction as it enables customers to complete checkout faster. It has also been implemented by a number of large companies like Shopify and Doordash (which I assume have A/B tested every part of checkout) and appears to be best practice.
Although Google Places API requests are very cheap ($17 per 1000 sessions) they are not free if you exceed the $200 monthly usage credit, so I’ve always been curious if its worth the thousands of dollars we spend on it each year.
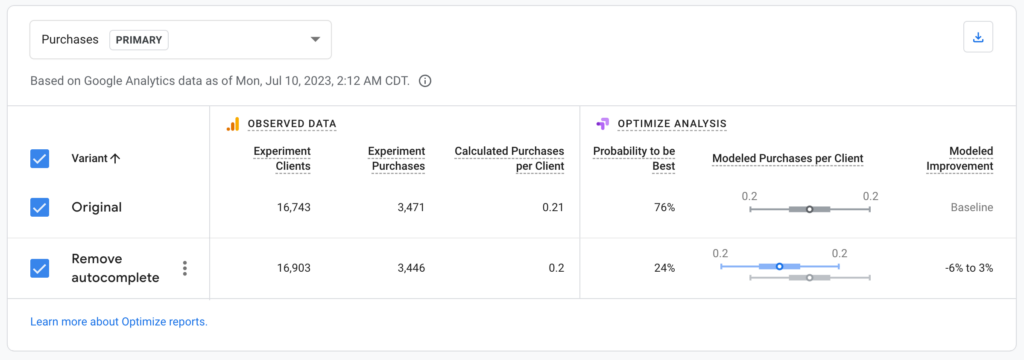
A/B Test Results
We ran our A/B test with 33k customers who made it to the checkout page. The results showed that address autocomplete did improve our conversion rate by ~1.5%.
For a $1M business, this improvement in conversion rate would lead to an additional $15k in sales- which should more than justify the cost of the API requests.
It is also fairly straightforward to implement. If you are using WooCommerce for your ecommerce site, check out the free Address Autocomplete with Google Places extension on WordPress.org.
Caveats
As with anything, results can vary depending on your customer base. The majority of our customers are based in the United States and complete their purchase on a mobile device. If you’re doing heavy volume it likely makes sense to run your own A/B test to measure the change. However, I suspect most sites will see a similar or better improvement in conversion as we did.
At Universal Yums we process a large amount of subscription renewals on the 1st of every month. We generally process at a rate of ~10k-20k renewals per hour until all the renewal are complete. If you’re looking to run a WooCommerce Subscriptions site at scale, here’s some tips.
Optimize Your Hosting Plan
We host with WP Engine on an enterprise plan (P4 APM). The cost, which includes New Relic, extra storage, and a dedicated staging environment is nearly $4k/mo. If you’re running a large subscription business, it’s important to invest in good hosting. You’ll want to be on a plan where CPU usage is at a comfortable level even on the big renewal days.
Increase Action Scheduler Throughput
Subscription renewals are processed via the Action Scheduler. To process more renewals at a time, you’ll want to increase batch size, concurrency, timeout period for scheduled actions. Please note, you’ll want to tune this appropriately for the amount of server resources you have.
If you ever find yourself in a situation where your subscription order id cache (_subscription_renewal_order_ids_cache) is not building properly, it could be because the database is timing out.
If you haven’t yet made the transition to the High-Performance Order Storage, WordPress needs to do a very taxing meta query in `get_related_order_ids` in order to rebuild the cache.
Coupon abuse is when a customer intentionally uses a coupon in a way it wasn’t intended. For example, a customer might create a new user account or use a different email address to evade coupon usage limits.
When you’re creating coupons, first make sure they are targeted for the customer you want to promote to. There’s a few ways to do this:
Set coupon usage limits: You can limit the number of times a coupon can be used in total or per customer. This can help prevent a single customer from using a coupon too many times.
Set a minimum purchase amount: You can require that a customer spend a certain amount of money before the coupon can be used. This can help prevent customers from using a coupon on a very small purchase.
Exclude certain products or product categories: You can configure your coupon to not work on certain products or product categories. This can help prevent customers from using a coupon on a product that you do not want to discount.
Use expiration dates: You can set an expiration date for your coupons to help ensure that they are only used within a certain time frame.
Use unique coupon codes: You can generate unique coupon codes for each customer or for each promotion. This can help prevent customers from sharing coupon codes with others.
If you have a lot of products, scheduling a sale for all of them can. be a pain. This WP CLI scripts prompts you for the dates of your sale, the percentage discount, and then schedules it for all your products.
This WP CLI script can schedule the product sale down to the hour and minute and can work in conjunction with the free Precise Sales for WooCommerce plugin.
You can adapt the script so that it discounts only certain products (specific categories, ones that have a price under X, etc.).