WP CLI Script to Duplicate WooCommerce Coupons

I love writing WP CLI scripts to accomplish tasks in WooCommerce. Recently we needed to generate hundreds of coupons that had a standard prefix + a unique code. We also needed to update the coupon meta for _wc_url_coupons_unique_url to use the unique code since our coupons apply via links.

There were a few no-code solutions I found that could have worked, but they all involved exporting data into a spreadsheet, updating the spreadsheet, and then using the spreadsheet to generate new coupons. A custom WP CLI script seemed much easier to manage.

WP CLI script to generate coupons

As you can see in the screenshot, the WP CLI prompts for the coupon code to duplicate. If the string “UNQCODE” is anywhere in the coupon code, it will be replaced with a unique random string of the same length.

The script also outputs all the generated coupon codes and URLs and saves it to a csv log file.

Feel free to check out the code and adapt it for your own use!

https://gist.github.com/devinsays/9e6030dec131366d2eadca4174f82d57

Development and Deployment Workflow for WooCommerce Sites

At Universal Yums our team manages a high scale WooCommerce site (6+ million orders). I always enjoy hearing how other teams manage their development and deployment workflow, and thought I’d share what works well for us.

Version Control

We keep the entire site (excluding WordPress core files) in version control. It might seem odd to version control all third-party plugins- but this ensures everyone on the team runs the same code and allows us to rollback the entire site to a previous state if something breaks.

Here’s an example .gitignore file showing how to exclude core files.

Project Management

We use GitHub to host our code and manage development.

Each feature or bug report is submitted as an Issue. We prioritize and assign Issues in the GitHub Project view. As Issues are worked on they are assigned a status of “Ready for Development”, “In Progress”, “In Review” or “Done”.

We do our best to scope all development work to tasks that can be completed in a week or less. This helps ensure frequent feedback and merges into the main codebase.

Limiting scope to a week is a forcing function to help us identify larger projects and break them down into smaller tasks. Many times we’ll release an MVP first (or keep it hidden from customers behind a feature flag) and then continue to iterate until it is feature complete. The development approach we took to rebuilding our theme is a good example.

Local Development

Our team is not proscriptive about the local development environment. My thinking is that people should use the tool that works best for them. Most members of the team develop on a Mac, but we have one on Windows.

For local development environment, half our team uses Laravel Valet and the other half uses Local WP. For IDEs, half the team uses VS Code and the other half uses PHP Storm.

Teams that manage a lot of sites in different server environments might find that a highly consistent Docker environment works better, but for our team managing a single site this works quite well.

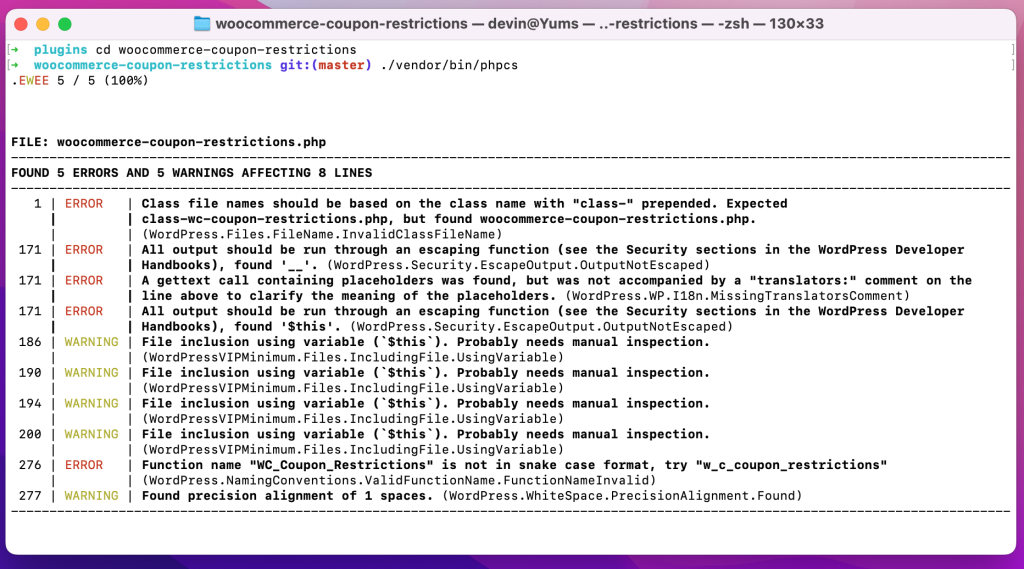
To ensure consistent coding standards, we have PHPCS configured and everyone has their IDE set to autofix on save.

Syncing Production to Local

In the past I’ve used custom bash scripts to export the database from production, import it locally, and update the URLs (which works great for smaller sites!).

However, with our current database size over 100 GB, this isn’t feasible. Instead, we export the production database to a separate server instance where we remove customers (from the users table), orders (from the posts table) and order meta (from the postmeta table)- which gives us a clean and lean database (less than 1GB) which we use for local development.

Although it would be ideal to have an exact replica to work with locally, this works fairly well for us. We always give code a secondary review in a staging environment with the full dataset before release to check for performance bottlenecks we may not have noticed locally.

Development Workflow

We continuously deploy code during the work week as pull requests (PRs) are approved. Most days we have anywhere between 2 and 12 releases.

New features or bugfixes are branched off main and worked on locally. When code is ready for testing and review, a new PR is made. Automated tests are run on Travis CI whenever code is pushed to a PR.

We use WP Engine for hosting, so it’s fairly easy to refresh our hosted development and staging environments with the latest data. However, due to our database size it does take a few hours, so we rarely refresh more than a couple times per month. (My ideal setup would be to spin up a fresh environment for testing each PR individually, but I don’t know of a quick and efficient way to do this without investing a huge amount of time in infrastructure.)

We do our deployments using Buddy (which is a fantastic tool). It runs our build steps (composer, npm) and then deploys changes. We autodeploy updates merged to the dev or stage branch.

If the code works well in our development environment, the PR is assigned over to another developer on the team for code review and a second round of testing our staging environment. The branch protection rules in GitHub require passing tests and code review approval before code can be merged to main.

Deployments to production are manual (i.e. log into Buddy and press a button). If a bug does happen to production, Buddy allows us to easily rollback to an earlier changeset while we fix the issue.

Pushing from Stage to Production

I see this question a lot from people who are just starting to work with WooCommerce: “How can I push my changes from staging to production?”

Although it’s easy to push code changes, database changes are really tricky. Order data can flow in at any moment so it’s never safe to completely overwrite the posts or postmeta table.

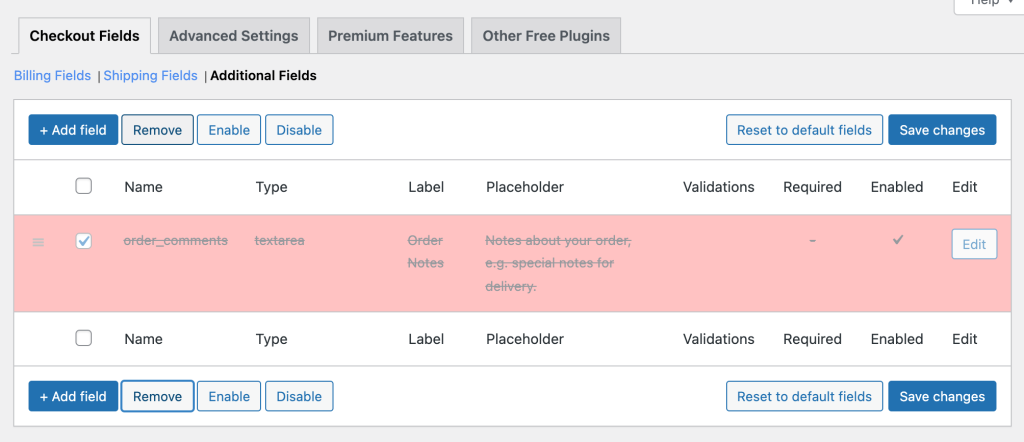
If a site is developed using a page builder and the post editor, the option is either to make the changes first in stage and then re-implement in production, or export and re-import the individual pages.

We use WP All Import to import new products to staging for testing. If everything looks good, we import to production.

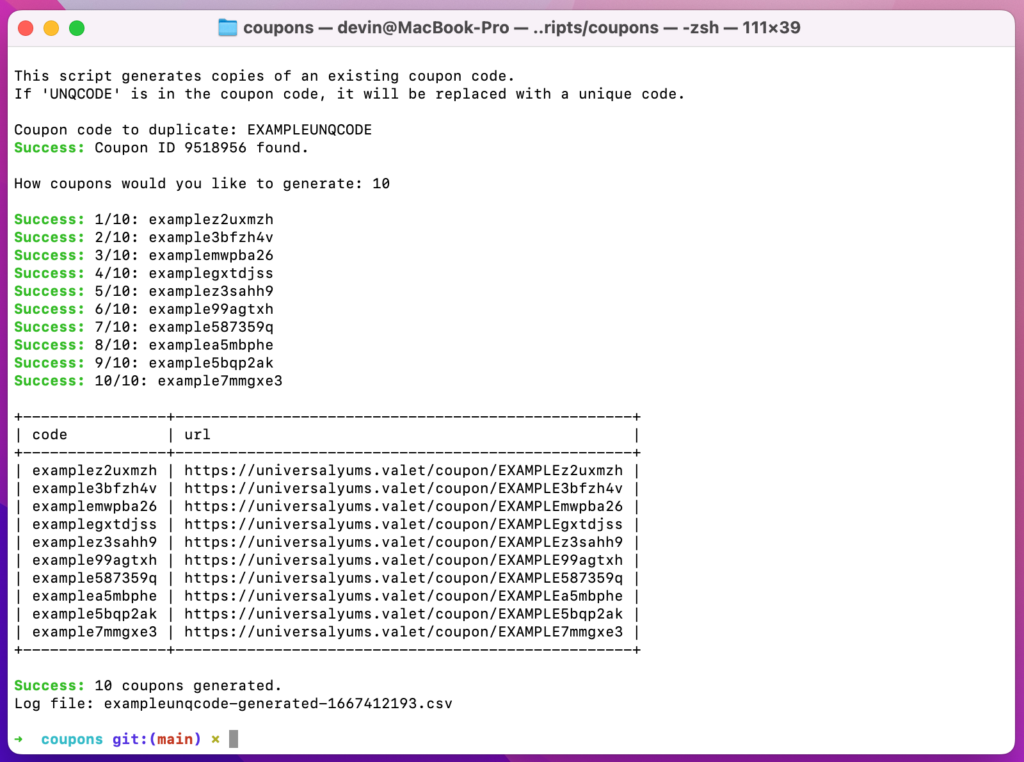
When settings or options changes need to go out with code updates, we’ll generally script those out using a WP CLI script and run the script as soon as deployment finishes (this also makes it easier to test a PR locally and in the different environments).

What’s Your Workflow Look Like?

This workflow works well for us as a team of five, but there would definitely be some challenges if we were to grow much bigger- especially in terms of having a shared development and staging environment. What’s your workflow look like? Any major differences?

Building a WooCommerce Customer Dashboard in React

At Universal Yums we decided to rebuild our customer dashboard in React. The dashboard is where customers go to make changes to their subscription, view their orders, update payment information, etc. Since it contains a lot of interactive elements, it felt like a good place to drop in React and avoid a lot of unnecessary page loads.

The dashboard is not entirely headless since we still use WordPress to render the initial page and handle authentication, but once you’re in React takes over and all the data is fetched using REST API calls. I made a short video showing how it works.

From a business perspective, I am not sure there is a real compelling business reason to move to React for most sites. A pretty similar result could be achieved with PHP rendered pages and a sprinkling of javascript on top. But if your team likes to work in React and doesn’t mind setting up custom endpoints to enable certain functionality, I think it is a fine route to go.

Code Linting and Auto-Formatting for WordPress Projects with VS Code

Linting is a way to automatically check code for potential errors and formatting issues.

Once code standards are defined for your WordPress project, linting issues can be displayed directly in VS Code as you work and most code formatting issues can be autocorrected on save.

See How it Works

To get started, you’ll need to have Composer installed locally. This setup uses the WordPressVIPMinimum and WordPress-Extra rulesets. If you want to see a working example, check out my WooCommerce Coupon Restrictions extension on GitHub.

Set up composer.json file

Linting can be set up for a plugin, theme, or an entire WordPress site. To get started, create a composer.json file in the root of your project directory.

To use the WordPressVIPMinimum and WordPress-Extra rulesets you’ll need to install two composer packages.

composer require dealerdirect/phpcodesniffer-composer-installer --dev
composer require automattic/vipwpcs --dev

Set up phpcs.xml

Next we’ll need to define the rulesets to use and which files or directories to check. That happens in the phpcs.xml file, which also goes in the root of your project directory. See this phpcs.xml as an example.

The file contents should look something like this:

<?xml version="1.0"?>
<ruleset>
	<arg name="basepath" value="."/>
	<arg name="extensions" value="php"/>
	<arg name="severity" value="4"/>
	<arg name="tab-width" value="4"/>
	<arg name="parallel" value="80"/>
	<arg name="cache" value=".phpcs-cache"/>
	<arg name="colors"/>

	<exclude-pattern>*/.git/*</exclude-pattern>
	<exclude-pattern>.github/</exclude-pattern>
	<exclude-pattern>*/vendor/*</exclude-pattern>
	<exclude-pattern>*/node_modules/*</exclude-pattern>
	<exclude-pattern>*/tests/*</exclude-pattern>
	<exclude-pattern>*/bin/*</exclude-pattern>

	<config name="testVersion" value="7.4"/>
	<config name="php_version" value="70407"/>

	<!-- Ignore warnings, show progress of the run and show sniff names -->
	<arg value="nps"/>

	<!-- Directories to be checked -->
	<file>.</file>

	<!-- WordPress -->
	<rule ref="WordPressVIPMinimum"/>
	<rule ref="WordPress-Extra"/>
	<rule ref="PSR2.Methods.FunctionClosingBrace"/>
</ruleset>

Run Linting and Fixing via Command Line

To see if everything is set up correctly, you can the checks via the command line.

To lint your codebase, run:

./vendor/bin/phpcs

If everything is working correctly, you should see an output like this:

To autofix linting issues (that can be corrected automatically, run:

./vendor/bin/phpcbf

Setup for VS Code

There’s a number of different VS Code extensions that integrate with PHPCS, but setup that has worked best for me is PHP Intelephense with PHP Sniffer & Beautifier. I also highly recommend setting an .editorconfig file for you project, and installing EditorConfig for VS Code to define you indent style and sizes.

Once you have these extensions installed, you should see linting issues highlighted directly in VS Code. Formatting and spacing issues can also be autoformatted and fixed on save.

WooCommerce: Prevent Order Items from Returning to Stock

Stock from orders can get added back to inventory for a variety of reasons: order was refunded, order was switched back to pending, or item was removed from an order.

Generally, this is what you would want WooCommerce to do. But in certain specific cases you may want to ensure stock is never returned to inventory. Here’s how:

// Defaults the edit order UI to not restock products on refund.
add_filter( 'woocommerce_restock_refunded_items', '__return_false' );

// Prevents items from being returned to stock when status changes.
add_filter( 'woocommerce_can_restore_order_stock', '__return_false' );

// Prevents items from being returned to stock when line item adjustment is made.
add_filter( 'woocommerce_prevent_adjust_line_item_product_stock', '__return_true' );

Workflow Tip: Make Processing Orders Editable

The line items in WooCommerce orders are only editable when the order is in a “Pending” or “On Hold” status. In general this makes sense. If an order is processing, it means the payment has already been accepted and any line item changes would likely require a refund (using the refund functionality) or a new payment (likely a separate order).

However, some business may have products that are frequently swapped or changed while an order is in processing, and it doesn’t make sense to have to switch the status to update the order. In those cases, you can use the wc_order_is_editable filter.

function devpress_processing_orders_editable( $is_editable, $order ) {
    if ( $order->get_status() === 'processing' ) {
        $is_editable = true;
    }

    return $is_editable;
}
add_filter( 'wc_order_is_editable', 'devpress_processing_orders_editable', 10, 2 );

WooCommerce: How to Remove the Order Notes Field on Checkout

In WooCommerce, an optional “Order Notes” field is generally shown at the bottom of the checkout page.

You can easily remove this field using a plugin or with custom code.

Remove with a Plugin

The free plugin Checkout Field Editor (Checkout Manager) for WooCommerce allows you to edit, remove or add fields in the checkout form.

  1. Install the plugin
  2. Go to the settings page for the plugin
  3. Go to the “Additional Fields” section
  4. Select the “order_comments” field and click “Remove”
  5. Click “Save Changes”
Checkout Field Editor Plugin

Remove with Code

Here’s the code snippet to remove the order notes field from checkout:

/**
 * Remove the order field from checkout.
 */
function devpress_remove_checkout_phone_field( $fields ) {
	unset( $fields['order']['order_comments'] );
	return $fields;
}
add_filter( 'woocommerce_checkout_fields', 'devpress_remove_checkout_phone_field' );

There’s also an alternate method, which is just a one line filter:

add_filter( 'woocommerce_enable_order_notes_field', '__return_false', 9999 );

WooCommerce: How to Remove the Phone Number Field on Checkout

If a customer’s phone number is not required for orders or support, removing the phone number field is a great way to simplify the checkout form.

You can either do this with code or a plugin, depending on what you are more comfortable with.

Remove with a Plugin

The free plugin Checkout Field Editor (Checkout Manager) for WooCommerce allows you to edit, remove or add fields to the checkout form.

  1. Install the plugin
  2. Go to the settings page for the plugin
  3. Select the “billing_phone” field and click “Remove”
  4. Click “Save Changes”
Checkout Field Editor Plugin

Remove with Code

Here’s the code snippet to remove the billing phone number field from checkout:

/**
 * Remove the phone number field from checkout.
 */
function devpress_remove_checkout_phone_field( $fields ) {
	unset( $fields['billing']['billing_phone'] );
	return $fields;
}
add_filter( 'woocommerce_checkout_fields', 'devpress_remove_checkout_phone_field' );